Wednesday 31 March 2010

Pulling in some favours

Finally, the wedding favours. They look easy but I really struggled to tie them up with cotton before adding the ribbon. This isn’t even how they are as I ended up threading the ribbon through the punched hole, which looked slightly neater.

Thank you to Mum for cutting out the circles of fabric and to Gayle at work who fetched the fabric from the Eagle Centre Market for me because I didn’t have time!

If anyone pulls these apart to eat them at the wedding, I may just hit them.

Stamps: One of a Kind
Cardstock: Very Vanilla, Elegant Eggplant
Ink: Elegant Eggplant
Accessories: Large Oval Punch, Scallop Oval Punch, ¼” Grosgrain Ribbon - Elegant Eggplant, Crop-A-Dile™

All products by Stampin' Up! ® (apart from fabric and chocolates)

Tuesday 30 March 2010

The wedding invitation

And here’s the much agonised-over wedding invitation. It’s made using a piece of Bridesmaid Speciality Designer Series Paper, which is cardstock quality so heavy enough for a card base. There are three panels, folded to about DL size, with a strip of distressed Elegant Eggplant down the front. The bands were the tricky bit. It is meant to be removed by sliding it off but, in the event of someone trying to untie the bow, I didn’t want it to look like a pig’s ear. So the band is actually tied together and the heart charm is tied on using purple thread.

Stamps: Sincere Salutations
Cardstock: Very Vanilla, Elegant Eggplant
Ink: Versamark
Accessories: ¼” Grosgrain Ribbon - Elegant Eggplant, heart charm, embossing powder

All products by Stampin' Up! ® apart from heart charm and embossing powder

Monday 29 March 2010

Egg-cellent idea (sorry)

With all the wedding preparations, Easter has almost passed me by. So I thought I’d make some extra little favours for the children at the wedding. There were going to be six of them... but another one popped out at the weekend, so I now have to find an egg-sized gift for someone who cannot yet eat solids.

I love this little chick - but I'm a bit obsessed with birdlife at the mo, having become totally hooked on a live webcam in an barn owl's nest box in California. Her name is Molly and she currently has four owlets, with another one expected to hatch any time now. Don't watch if you don't like seeing rodents being dismembered... or if you want to get anything done around the house. Otherwise, click here. It's best in the evening (UK) as then it's daylight over there and full colour for us.

So, back to this punched chick - I saw a similar one out there in Blogland but unfortunately cannot remember who created it. If it was you – or if you know – please leave a comment and I’ll edit to give credit where it’s due. It was fun to make... and I’m coming round to the idea of a “Mum and me punch-up” in the summer, which sounds more violent than I hope it will be. It would involve creating fun animals from punches – who’s up for that? Leave me a comment or send me an email please.

ETA: It was Carol - thanks for spotting it, Carol.

So this chick... all you need is an oval punch and a circle punch. I made the beak from one of the flowers from Boho Blossoms but you could cut it freehand. And the flower is, of course, from Boho Blossoms but is an optional extra.

I stamped the egg with the speckles from Bird on a Branch, available from Thursday in the new Mini. And the pouch is the same one as this.

Stamps: Bird on a Branch
Cardstock: Elegant Eggplant, Pale Plum, Barely Banana textured and smooth (no special reason – just scraps), Very Vanilla
Paper: Patterns – Perfect Plum
Ink: Pale Plum
Accessories: Stampin’ Write Journaller, Boho Blossoms punch, large oval punch, 1 3/8” circle punch, large tag punch

All products by Stampin' Up! ®

Sunday 28 March 2010

Wedding placecards

The wedding. Yes, it’s looming and I’m getting there. These are the place cards. They were all going to be the same but I didn’t have enough of the swirly paper left after the invites - which used most of a full sheet each - so decided to make the men’s cards using the more masculine striped paper and without the ribbon. The names are printed on good quality printer paper (my printer has a hissy fit if you put cardstock in it) in a colour that is as near to Elegant Eggplant as I could get. The Elegant Eggplant panels are distressed ever so slightly.

You've not seen the invites yet, have you? Maybe next time...

Cardstock: Elegant Eggplant
Paper: Bridesmaid
Accessories: ¼” Grosgrain Ribbon - Elegant Eggplant

All products by Stampin' Up! ®

Friday 26 March 2010

My swap card

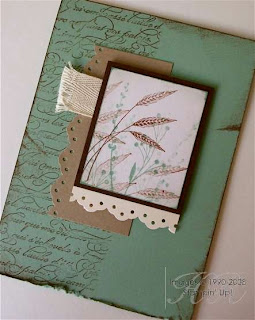
Remember that training day I went to in Sheffield the other week? I completely forgot to show you my swap card.

My top tip for making swaps is this: keep it simple. Because you’ll get REALLY fed up making the same card over and over again if there are lots of steps to complete. Wish I’d followed my own advice when making these. I don’t even particularly like it any more.

It is based on this card, which I made during Sale-A-Bration but the design is much more suited to the elegant birdcage than the earthy stamps from Autumn Days.

Stamps: En Francais, Autumn Days
Cardstock: Sage Shadow, Chocolate Chip, Kraft, Very Vanilla
Ink: Close to Cocoa, Sage Shadow
Accessories: Eyelet Border Punch, Twill Tape

All products by Stampin' Up! ®

Wednesday 24 March 2010

Wedding bells getting louder!

I’m frantically making wedding stationery at the moment for my brother’s wedding in less than two weeks. The invites have gone out (thankfully), the placecards are made (phew!) and now I’m working on the favours and the thank yous. This is the thank you card – I just have to make the rest now! I’ve folded the cards, stamped and stuck the inserts, stamped and cut out the flowers and cut all the pieces for the front. Just need to stamp “thank you” on them (I have two chances on each strip!) and then assemble.

As for the favours... don’t ask. Not going well at the moment.

On another topic, who’s going to the NEC this weekend? I’m going on Saturday and expect to see a few familiar faces!

Stamps: One of a Kind, Wonderful Words
Cardstock: Elegant Eggplant, Very Vanilla
Paper: Bridesmaid Speciality Designer Series Paper (which is actually cardstock weight). Insert is good quality printer paper (still not as good to stamp on as SU Very Vanilla!)
Ink: Elegant Eggplant
Accessories: Scallop Edge Punch

All products by Stampin' Up! ®

Monday 22 March 2010

Two more little dickie birds

You know me, I don’t waste anything... and I had some Make & Take packs left over from my Sale-A-Bration workshops in January and February. I adapted them to use with this gorgeous little set which is coming to a Mini Catalogue near you very, very soon.

So, for my team meeting at the weekend, I took the same Make & Take packs - see original card here - and added a scrap of Very Vanilla cardstock so that we could stamp the bird again in another colour and cut out its body to pop up, leaving a So Saffron beak. We also added a punched flower and brad. Very simple and really cute!

Stamps: My Sweet Pea
Cardstock: Rose Red, Regal Rose, Taken with Teal, So Saffron, Very Vanilla
Ink: So Saffron, Taken with Teal, Regal Rose
Accessories: 5/8” Grosgrain Ribbon - Regal Rose, Striped Grosgrain Ribbon – So Saffron, Boho Blossoms punch, Silver brads, Eyelet Border Punch, Corner Rounder

All products by Stampin' Up! ®

PS: The new products from yesterday (which nobody even tried to guess – I’m disappointed in you!) were the Two-Step Bird punch, the Designer Series Paper and, on the card on the left, the sentiment stamp which comes from a new set called Vintage Vogue.

Sunday 21 March 2010

Two little dickie birds

I held a team meeting yesterday for members of my downline. For those who don’t know, when you sign up as a Stampin’ Up!® demonstrator, you have to sign up through an existing demonstrator. This is a great system as it means you have somebody to guide you through the signing up process and help you along the way, should you want it of course.

I now have a reasonable-sized team and some of them came along for yesterday’s get-together, where we made colour charts, talked about our recent training sessions in Sheffield and Coventry, saw some stunning demonstrations from Kelly and Tracey and, naturally, made a couple of cards.

This is one of our Make & Takes, made with brand new products from the new Mini catalogue, which goes live on 1st April. I will be holding a special Mini Catalogue Launch event on Saturday, 24th April, 9.30am-noon, so be sure to register for a place on this so you can see even more gorgeous goodies from this little gem of a catalogue.

As I mentioned about a week ago, at the training event I attended in Sheffield, we made swap cards and I received lots of fabulous swaps in return. The card on the left is one of them, received from the very talented Monica. I thought this would be perfect for a Make and Take so remade it in some of my favourite colours for the card on the right.

I’m not going to list the recipe just yet: I want to see how many new products you can spot!

All products by Stampin' Up! ®

Saturday 20 March 2010

Simple card for a sunny day

Another of our In Love With Stamping challenges was a sketch – four panels with an oval in the centre and an embellishment on the oval. You could turn it, flip it, stretch it... but I just went with the sketch.

I cracked open my Sunny Day Simply Scrappin’® kit for this one as there’s a rather handy oval self-adhesive die cut (don't you dare call them stickers!) in it there. Apart from the Tempting Turquoise card base and the Old Olive scallops, the whole of this card is made from the kit. Oh, and the greeting of course... but you get the idea. Lovely, lovely kit – and such a quick and easy card to make!

Stamps: Sincere Salutations
Cardstock: Tempting Turquoise, Old Olive
Ink: Old Olive
Accessories: Sunny Day Simply Scrappin’® kit

All products by Stampin' Up! ®

Thursday 18 March 2010

Funky flower

These little flowers are all the rage in Blogland at the moment. And they’re so easy to make, too! All you need is a Scallop Circle Punch and some cardstock. Everything else I’ve used here is an optional extra.

Punch out about eight scallops – you can use more than one colour if you like but I chose Orchid Opulence, a colour I rarely use but this was for an inspiration challenge based on the wedding cake image shown here.

Snip towards the centre of the scallops all the way round.

Then you have two options – you can dampen the cardstock lightly but I didn’t know this when I made my flower. Wetting it will give you a slightly more distressed-looking flower so it’s up to you. Have a play around and see which you prefer.

Place a scallop in the palm of you hand and press the centre to create a cup shape. Repeat on all the scallops and then put them together. You can either join them with SNAIL Adhesive® or similar or make a hole in the centre and add a brad. Then scrunch the whole lot up in your hand and fiddle with the petals until you are satisfied.

To make the centre of the flower, I punched a 1” circle of Only Orange and then prised the layers of the cardstock apart. Why? Well it make it thinner and therefore more flexible. I also turned it over so that the rough side was showing, which gave it a nice texture. I then fluffed these pieces up to make the flower centre.

The leaves are created from the Oval Punch, punched once and attached to scrap paper, then punched again to give a pointed end. They are scored down the centre so that they sit up more like leaves.

The box is stamped with the flowers from One of a Kind, stamped in Orchid Opulence on scrap paper first and then on the cardstock to create a lighter image (“stamping off”).

Stamps: One of a Kind
Cardstock: Very Vanilla, Orchid Opulence, Gable Green, Only Orange
Ink: Orchid Opulence
Accessories: Oval punch, Scallop Circle Punch, 1” circle punch

All products by Stampin' Up! ®


Monday 15 March 2010

Bright and springy

I LOVE this card design, which I blatantly copied from a US demonstrator’s blog here. It’s really easy to make and looks fab, too – what more could you want? And all you need are some scraps of Designer Series Paper, a Scallop Square Punch (see special offer here) and a flower embellishment.

I punched these from scraps from the Tall Tales and Kaleidoscope Designer Series Paper packs and the Petal Party Simply Scrappin’ kits. But you don’t need to go out and buy paper packs specially for this card – just use any leftovers.

The felt flowers are gorgeous and come from the Flower Fusion pack. I’ve held three together with a silver brad.

Finally, I stamped the greeting from A Bit of Birthday Cheer in Pink Passion ink. Easy!

Stamps: A Bit of Birthday Cheer
Cardstock: Whisper White
Paper: Kaleidoscope, Tall Tales
Ink: Pink Passion
Accessories: Petal Party Simply Scrappin’ Kit, Flower Fusion felt flowers, silver brad

All products by Stampin' Up! ®

Sunday 14 March 2010

Classes and events

Just to alert you to details of all upcoming classes and events (which you can view by clicking the Events tab just under my blog header). I am aiming to keep these details up-to-date as much as possible, so you'll be able to who is going to which event. This means you can check if I have received your payment, see if your stamping chums are going and see how many places are left. So if you're not sure if you've registered for an event, check the list and you'll see.

Talking of classes, I have three places left for the One of A Kind event - and if you want to come along and take advantage of the stamp set thrown in, I need to know asap so that the stamps will be here in time. Let me know by 11am on Monday please!

As always, please check with me before sending off payment, just in case someone has nipped in before you and I haven't managed to post an update. Thanks!


Friday 12 March 2010

Thinking outside of the (gift) box

Sorry for the lack of posts, it's been (yet another) hectic week. Yesterday I spent all day at a Stampin' Up! event - yes ALL day... from 10am to 10pm! But it was brilliant. I learned loads, met lots of lovely people, won prizes (!) and received some fantastic swap cards, which I will share with you when I get chance to photograph them in daylight (I don't think daylight is on the agenda for today, by the look of things outside).

Meanwhile, here is my second attempt to use my stamps in a different way. I stamped the “bubbles” from Circle Circus repeatedly (I use the Stamp-a-ma-jig® to get them close together without overlapping) and then cut out a rectangular shape from the stamped area. A simple strip of ribbon and a bow turns this into a present. An easy card for anyone, including those tricky beasts, men, if you create it in masculine colours. Although I don’t like to send a card with a present on it unless I’m actually giving someone a present – are you with me on that one or not?

Stamps: Circle Circus, A Bit of Birthday Cheer
Cardstock: Rose Red, Basic Black, Very Vanilla
Ink: Rose Red, Whisper White
Accessories: Black Gingham ribbon, Corner Rounder

All products by Stampin' Up! ®

Tuesday 9 March 2010

What's new?

The other challenge I came up with was one I lived to regret – use your stamps in a different way to normal. So turn one image into another.

This was an idea I saw on a blog ages ago and had a go at but never got round to turning into a card. So I had another go.

It’s very simple – you just stamp the owl from Animal Stories, draw a freehand tail and then add some whiskers. I drew the eyes nose and mouth, too... and a doodle line for the cat to sit on. I hate my handwriting – years of shorthand followed by typing everything have ruined it – but I thought handwriting was the best style for this card, with its doodled whiskers and doodling around the black layer.

Stamps: Animal Stories
Cardstock: Kraft, Basic Black, Very Vanilla
Ink: Pumpkin Pie
Accessories: Stampin’ Write Journaller, ¼” Grosgrain Ribbon - Pumpkin Pie

All products by Stampin’ Up!®

Sunday 7 March 2010

Distressed distressing

This was another for the neutrals colour challenge on In Love With Stamping and this is what happens when distressing goes wrong – I slipped big time in the bottom right hand corner! Oh well, there are no mistakes and all that...

Stamps: Lovely as a Tree, A Bit of Birthday Cheer
Cardstock: Kraft, Close to Cocoa, Chocolate Chip, Very Vanilla
Paper: Patterns DSP - Chocolate Chip
Ink: Chocolate Chip, Close to Cocoa
Accessories: 5/8” Grosgrain Ribbon - Chocolate Chip, Scallop Square Punch, Blender pen

All products by Stampin’ Up!®

Friday 5 March 2010

Neutral colour combo

As a member of the In Love With Stamping Design Team, I have to come up with at least six projects a month, at least one to fit each of the four challenges.

Each month we have a sketch, a colour combo, an inspiration piece and an “anything goes” challenge. It was my turn to come up with the colour combination and I chose “any neutrals and browns” – but not necessarily all of them.

I love this combination of Kraft, Very Vanilla and Basic Black and I think I’ll use it again. I stamped the So Many Scallops stamp and punched it out with the Scallop Square Punch – very fortuitous as these two products are part of the Perfect Pairs promotion this month. Of course I didn’t know that when I made the card!

I mounted this on a square of Basic Black and then made another scalloped frame to go behind it. I made this from four punched scallop squares joined together. You can see the joins, just, but I don’t think it matters too much.

And then I sacrificed some of my beautiful black striped ribbon. I know it’s far too big for the little card but I quite like that effect. It would have to go in a larger envelope though.

Stamps: So Many Scallops
Cardstock: Kraft, Very Vanilla, Basic Black
Ink: Basic Black
Accessories: Scallop Square Punch, Wide Striped Grosgrain Ribbon - Basic Black

All products by Stampin’ Up!®

Tuesday 2 March 2010

Love punches? Great news!

Great news if you love punches - there's a special offer from Stampin' Up!® this month... and a brand new punch!

During March, if you buy a qualifying stamp set, you can purchase the co-ordinating punch for 20% off! Plus, if you hurry, you can be one of the first to buy the new Full Heart punch - now available in the UK for one month only (or while supplies last). This punch will then not be available until the new catalogue is released on 1st October.

Qualifying stamp sets and punches are:

Simply Said - £22.95
Full Heart Punch - £10 (normal price £12.50)
If you already have Simply Said, don't worry - the Full Heart Punch is also available separately at its usual price of £12.50.

In The Stars - £24.95
Large Star Punch - £10 (normal price £12.50)

Flight of the Butterfly - £23.95
Butterfly Punch - £10 (normal price £12.50)

Say It With Scallops - £14.95
Scallop Square Punch - £10 (normal price £12.50)

Oval All - £14.95
Scallop Oval Punch - £10 (normal price £12.50)

The other good news is that you can mix and match - ie, if you buy any of the above stamp sets (including the French or German versions), you may purchase any of the above punches as the discount price. The only restriction is that it is one discounted punch per stamp set.

A word of caution: if you've fallen in love with the Full Heart Punch, please don't delay. Demonstrators are already showing a huge amount of interest in this punch, which usually means it is likely to sell out quickly. And once this batch has gone, the punch won't be back until 1st October.

Monday 1 March 2010

Are you ready for the Stampin' Up! Experience?

Please note: the Sheffield and Coventry events are now fully booked. Sorry!

Do you want to see how a workshop should be done, instead of my usual "oops, I forgot to bring..."?

Stampin' Up!® is holding a series of events across the country in March and April, with demonstrations, Make & Takes and, of course, prizes! These events are free to attend but you must be invited by a demonstrator, who will give you an invitation which will act as both your admission ticket and your prize draw form.

Below is a list of events. I will be attending the Sheffield event but you are welcome to attend any of the events. Please get in touch if you'd like an invitation. I do need firm answers though because your name has to be registered with SU and, just like any demonstrator, they need to know numbers so they know how many Make & Takes to provide. Places are limited, so don't delay!

11 March 2010
Beauchief Hotel
161 Abbeydale Road South
Sheffield
S7 2QW
Time: 7-9pm
www.beauchief-hotel.co.uk

13 March 2010
Glasgow Pond Hotel
Great Western Road
West End
Glasgow
G12 0XP
Time: 7-9pm
www.glasgowpondhotel.com

18 March 2010
Aston Court Hotel
80-90 Holyhead Road
Coventry
CV1 3AS
Time: 7-9pm
www.astoncourthotel.co.uk

20 March 2010
Parkside International Hotel
Bath Road
Reading
RG30 2BE
Time: 7-9pm
www.parksideinternationalhotel.com

10 April 2010
Novotel Plymouth
Marsh Mills
Plymouth
PL6 8NH
Time: 3-5pm
www.novotel.com


The small print

This is my personal blog and my sole responsibility as an Independent Stampin' Up!® demonstrator. All images are © Stampin' Up!® All content including photographs, projects and text are © Helen Read, unless otherwise stated. Please feel free to copy my ideas for your personal use and inspiration - if you are a SU demonstrator you may use these ideas for your events but please give credit where it is due. Please do not use my ideas for monetary gain, competitions or publication. The images on this blog - including blog buttons - should not be copied and used elsewhere on the internet or on CDs.